Date: November 2017
Class: Computer Vision
Categories: Computer Vision, Python
Partner: William Spies
video post-processing using computer vision.
Project description

This project’s goal is to erase red text written on a piece of newspaper from a prerecorded video. In the video there is a pen that scans across the newspaper to indicate how much of the text should be erased in that frame. To do this there are two parts to the project the pen detection and erasure of the words and the tiling of the newspaper background using non-parametric sampling.
 Firstly a mask of where the red text is located is created by taking the first frame of the video, converting it into HSV and checking which pixels belong to the red text by scanning through the image and deternimine which pixels fall within an aproximate range of the red hughe.This should fully capture the words while leaving the red of the pen tip out of the mask if our range are chosen correctly. A closing function is then performed on the detected red text so that we can make sure that when we replace the text with white we will erase the entierty of the text. At this point the newspaper background of the frame is replaced with black. At this point the Text mask and the original frame are then passed into the tilingMaskSetup function that will obscure the pen, the graphical error at the bottom of the frame, and the margins of the frame that do not contain text with blue boxes. The tilingMaskSetup function will also compare the text mask to the current video frame and copy the non black locations of the text mask onto the current frame.This will leave us with a frame in rgb that looks similar to the one that was pulled from the video except there are now blue boundary boxes over the margins, where the pen would be in the frame, and the lower portion of the frame as well as the areas where the text is being replaced by white. Now that the frame is in this form it is ready to undergo the second part of our algorithm, background tiling.
 The second part of the algorithm will look through the fully processed frame from the first portion and replace the text that was whited out by the background newspaper. The way this was accomplished was by applying the texture synthesis by non-parametric sampling algorithm on the processed frame. First we had to take a random sample of the newspaper portion of the frame. This random sample needs to be able to blend in wih the rest of the background image that is why the area where the pen was, the margins, and the graphical error were obscured, so that those areas would be easier to ignore when looking fo a sample tile (shown on right).
The algorithem would then search for the white areas where the text was removed in the tilingMaskSetup function, when it finds one of the white pixels it will then perform the sum of squared difference (SSD) between a number of pixels before the white pixel was detected and pixels on the right hand side of the white pixel.
The second part of the algorithm will look through the fully processed frame from the first portion and replace the text that was whited out by the background newspaper. The way this was accomplished was by applying the texture synthesis by non-parametric sampling algorithm on the processed frame. First we had to take a random sample of the newspaper portion of the frame. This random sample needs to be able to blend in wih the rest of the background image that is why the area where the pen was, the margins, and the graphical error were obscured, so that those areas would be easier to ignore when looking fo a sample tile (shown on right).
The algorithem would then search for the white areas where the text was removed in the tilingMaskSetup function, when it finds one of the white pixels it will then perform the sum of squared difference (SSD) between a number of pixels before the white pixel was detected and pixels on the right hand side of the white pixel. 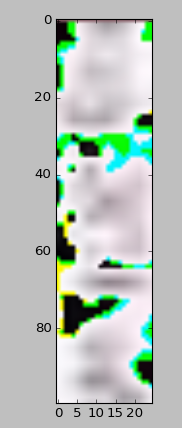 To determine what pixels have the SSD performed on them a variable called overlapwidth, with that the deep into the frame and the sample tile that is being considered. For example if the overlap width of 50 the program will do the SSD on the number of pixels equivalent to the sample tiles hight and a length of 50 starting at the first pixel to the left of the detected white pixel moving to the left and the pixels on the left hand portion of the sample tile. When the ssd is calculated between the two regions the lower the resulting value the better a match the two areas are. In the algorithm normal values of the SSD were between 500k at the lowest and 2mil at the highest value. To make sure the algorithm will compile quickly the limit of acceptable SSD’s is anything less than 1.5Mil. If the range were lower than 1mil, as the blanked out words get tiled in the program eventually reaches a point where the algorithm has trouble finding a sample tile that will produce a SSD less than 1Mil. So increasing the upper limit to 1.5 mil was the easiest way to solve the issue and prevent the code from taking a long time to produce images.
At the point when the program finds a sample tile that will produce an acceptable SSD value it then writes over the processed frame inserting the tile into the whitespace and covering a portion of it up. The algorithm will then create a new tile sample and continue to search for white pixels and when it finds one the SSD algorithm will run again. This will continue until the entirety of the whited out words are tiled over. Once that is complete the program will return the fully tiled frame to the main program. When the tiling has completed and the fully tiled frame is then used to create a tiled mask. This is created similarly to the other masks discussed earlier but it contains the newly tiled over section created in the tiling function.
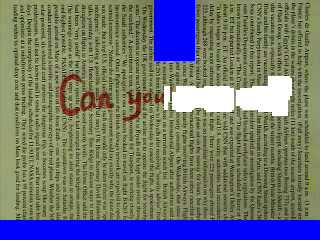
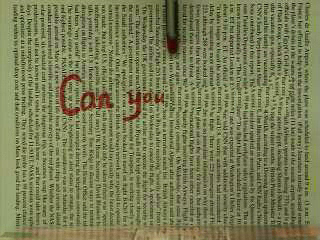 Now that all the masks have been created and we have what the final frame should look like we can move on to the video capture loop. In this loop we open up the video, create an array that represents the current frame, and check to make sure that the video has not reach the end. If the video has not ended then the frame is converted into HSV color space and passes the frame into the eraseTextWithMask function. This function will create a mask for the red pen tip and perform erosion and dilation to make sure the entirety of the tip is encompassed in the mask image the method for this is similar to what was done previously to create the mask for the red text. At this point the program finds the position of pen by finding the red tip of the pen. Then everything to the right of the pen’s current position is replaced by the equivalent pixel values from the fully tiled image and returns the new image to the main program for display. This method of detecting and replacing everything right of the pen tip when repeated over multiple frame will produce the illusion that the text is being erased. The returned image is then displayed next to the unprocessed original version of the frame for comparison. The video loop continues in this fashion until the last frame of the origin video. An examplt of one of the output frames s shown on the left.
Below is a link to repository with the final code.